Wednesday, March 11, 2009

Using secured DFS in Dynamic Web Service Activity

Deploying DFS on a seperate app server in SSL mode
1. Deploy emc-dfs.ear on the weblogic server.
2. generate self signed cert using keytool

keytool -genkey -alias webtopcert -keypass webtopcert -keystore webtopcert.bin -storepass webtopcert

3. copy webtopcert.bin generated in the above step to WL_HOME\server\lib
4. Configure the weblogic server to work in SSL mode at Environment->Server->Admin Server
5. On Configuration->General tab enable https.6. On the Configuration->Keystore tab add the keystore and identity. Point botht he trust and identity the webtopcert.bin created in step 1. and add 'webtopcert' without quotes as the password.7. On the Configuration->SSL tab fill in the alias and pass phrase
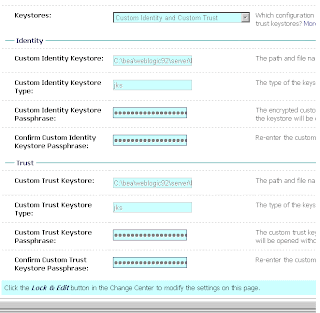
8. Activate changes and try the URL
https://hostname:7002/services/core/ObjectService. Make sure the hostname is same as the CN provided when creating the cert.

Exporting cert from IE and importing it to process builder and JMS
9. Export the certificate from the DFS site through IE.


10. Copy this .cer file to the machine where Process Builder and Java Method Server is installed and running.

11. Import the certificate generated from IE in the above step to the process builder JDK in C:\Program Files\Documentum\java\1.5.0_12\jre\lib\security using the following command.

C:\Program Files\Documentum\java\1.5.0_12\jre\lib\security>"C:\Program Files\Jav
a\jdk1.6.0_10\bin\keytool" -import -keystore cacerts -storepass changeit -alias webtopcert -file webtopcert.cer

12 Import the same certificate in the JDK for the Java Method server as well at
C:\Documentum\jboss4.2.0\jdk\jre\lib\security using the same command.

13. Verify the cert is added to the keystore using the following command
"C:\Program Files\Java\jdk1.6.0_10\bin\keytool" -list -keystore cacerts -storepass changeit

14. Restart the JMS and Process Builder.

Connecting DWS to secured DFS
15. Create a Dynamic Web Service activity in any workflow, go to the 'Web Service Configuration' tab of the Dynamic Web Service Activity's Activity Inspector and add the https URL in the 'URL path to WSDL file' field and hit the 'Read WSDL FIle' button. The 'Port Type' and 'Operatrion' drop downs should get populated.
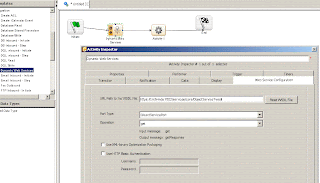
You have now connected a Dynamic Web Service Activity with a secured DFS successfully!

Wednesday, January 21, 2009

Wiring it all together: Webtop, SSL, Tomcat, IIS and ISAPI

Webtop or any of its derivatives can be locked down using SSL. SSL can be enforced at the application level where Webtop is running(eg- tomcat) or have a forward proxy enforce the SSL(Eg - IIS).

This post will walk through

1. Setting up Webtop on SSL using tomcat
2. Bridging IIS and Tomcat(non SSL) using ISAPI connector
3. Setting up SSL on IIS and accessing Webtop on tomcat through ISAPI connector


Setting up Webtop on SSL using tomcat
1. If you have JDK 1.5 or higher go to the JDK bin dir and execute
keytool -genkey -alias webtopcert -keypass webtopcert -keystore webtopcert.bin -storepass webtopcert

2. The keyTool will ask you a bunch of questions, the only thing that is important here is to make sure you give the host name of the tomcat machine when it asks for your first and last name.

3. Copy the certificate generated(in our case webtopcert.bin) to any directory of your choice, better if you put in in a directory inside tomcal installation.

4. open up server.xml from %Tomcat%/conf and uncomment the tag that starts with Connector port="8443" protocol="HTTP/1.1" SSLEnabled="true".

5. Add the follwong attributes to the tag.
keystoreFile="C:\Program Files\Apache Software Foundation\Tomcat 6.0\conf\webtopcert.bin"
keystorePass="wdkapps"

6. A little tweak is needed to get UCF to play well with SSL. In the ucf.installer.config.xml file in the appserver add the following XML snippet.(C:\Program Files\Apache Software Foundation\Tomcat 6.0\webapps\webtop\wdk\contentXfer)
<option name="https.host.validation" persistent="false">
<value>false</value>
</option>

This will make sure that for new clients this ucf option is set in the downloaded ucf.client.config.xml file. You could also manually add this option to the downloaded cleint config file in ucf under C:\Documents and Settings\username\Documentum\ucf\hostname\shared\config

try https://hostname:8443/webtop

Bridging IIS and Tomcat(non SSL) using ISAPI connector

The tomcat instruction on how to bridge IIS and tomcat is pretty comprhensive.

http://tomcat.apache.org/connectors-doc/webserver_howto/iis.html

Start with a simple workers.properties and uriworkermap.properties blow is a sample that I used.

workers.properties

worker.list=worker1

worker.worker1.host=10.241.209.30 <-- this is the host where tomcat is running worker.worker1.port=8009 <-- make sure the port 8009 is open on the tomcat m/c worker.worker1.lbfactor=3.5 worker.worker1.cachesize=10 worker.worker1.cache_timeout=600 worker.worker1.socket_keepalive=1 worker.worker1.socket_timeout=300

uriworkermap.properties

/examples/*=worker1
/examples/*.jsp=worker1
/examples/servlet/*=worker1
#This will forward every request to tomcat, so /webtop should also get forwarded to tomcat
/*=worker1

try http://hostname/webtop

Setting up SSL on IIS and accessing Webtop on tomcat through ISAPI connector


In this scenario tomcat where webtop is installed is not in SSL mode. IIS can be set up in SSL mode(link below) and bridged to tomcat through ISAPI as per the instructions above. Here is a very detailed tutorial how you can set up IIS in SSL mode using a self signed certificate.

http://www.xenocafe.com/tutorials/self_signed_cert_IIS/self_signed_cert_IIS-part1.php

try https://hostname/webtop

Tuesday, January 13, 2009

HTTP Inbound Initate Activty and Debugging a Process

In this post I will explore the new debug feature in process builder 6.5 and also the HTTP inbound Initiate activity template. I will add to the workflow that was developed in the previous posts

HTTP Inbound Activity
HTTP Inbound activity is part of BPS or Process integrator product from Documentum. They basically let the outside world(outside of Documentum enterprise space) to send and receive messages to Documentum enterprise application through Documentum Process. Thre are 2 mail components for BPS outbound and inbound. outbound will send messages out and inbound will listen for messages. The messages can come/go in different formats/protocols like HTTP, JMS and Web Services. Here we will look a how we can send a http message to a Documentum process. To keep it simple w will not extract any content from the http message we are going to send, although a normal application will do that.

Adding HTTP Inbound Initiate activity
1. Open the workflow built in the last couple of post and uninstall it
2. In the 'Activity Templates' side bar open up the 'Integration' folder. The 'Integration' folder contains all the activities that belong to BPS/Process Integrator that deals wil Inbound and Outbound messaging for various protocols.
3. select the activity called 'HTTP Inbound Initate' and drag it to the work area. Since this is an initiate step it can be the start step of the workflow.
4. Connect the connector so that it flows from HTTP inbound Initiate activity to the first user activity 'Activity-1'
5. Open up the Activity Inspector for the HTTP inbound Initiate activity and go to the 'HTTP' tab and fill in the 'URLSuffix' box with 'BPMPost', without the quotes. Also set the 'Request Type' combo box to 'Post'.

6. Save, validate and install
Debugging Process flow

7. Goto File->Preferences and take a not of the 'HTTP/WebService Inbound port number', the default is 13,000.
8. Create a html file like the one shown in the image. Note that the port number from the preference and the URLSuffix from the Activity Inspector is used in creating the URL to which the form is submitted.

9. Go ahead and hit the debug button on the tool bar.
10. In the dialog that opens select the radio button that says 'Start workflow using the Inbound Initiate Listener' and hit the button 'Start listeners'
11. Open the HTML file that was created in the step 8 and hit the submit button.
12. You will get a response saying 'HTTP request processed success'
13. The debugger will step through your activities and wait on the 'Activity-2', if the workflow was exactly created as this and previous posts directed.
14. The debugger is stopped at this point because there is an exception path defined for this flow. In the debugging console that opens up below the process work area you can see 2 boxes which list 'Forward Activities and 'Reject activities'. Select the forward activity and buttons will show up below that. Hit the 'Finish' button.
15. The debugger will continue executing the rest of the process and completes successfully.
16. Clicking on the console tab will show the debug log.
17. For the automatic activity to be executed successfully during debug, make sure the class file is copies to C:\Program Files\Documentum\bpm\classes\custom. This is where the debugger loads workflow method classes from.

Documentum Workflow for dummies -II ( Automatic activities)

Lets look at how we can add an automatic activity to the workflow we created in the previous blog post.

Creating a workflow method for automatic activity
1. Here is a template workflow method. Create one like this using your IDE and compile it


2. drop the compiled class in C:\Documentum\dba\java_methods, including the package structure if any.
3. open up Documentum Administrator and go to Job management->Methods
4. Select menu File->new and create a new method object. The properties page of the newly created method should look like this

5. log out of DA and open up a IAPI command window and login to the docbase through iapi
6. type

retrieve,c,dm_method where object_name='SampleAutomaticActivity'

7. this will retrieve the object id of the method object we just created.
8. type

dump,c,l

9. This will dump the method object. if you look at the object dump the attribute a_special_app will not have a value assigned.
10. Assign the a_special_app attribhute the value 'Workflow' without the quotes. Type the follwoing line to do that.

set,c,l,a_special_app
SET>Workflow

11. save the property change. Now the workflow method is ready to be attached to an automatic activity

save,c,l

Creating automatic activity in the process
1. open up the workflow/process created in the previous blog in process builder.
2. uninstall the process/workflow.
3. click on 'create automatic activity' icon on the top toolbar(its the one with the image of a gear wheel)
4. Click anywhere in the workspace. An automatic activity instance will be palce where you clicked.
5. go back to the 'selct objects' mode by clicking the mouse pointer icon on the toolbar.
6. Drag and place the automatic activity between manual activities activity-2 and activity-3(or anywhere you choose between initiate and end)
7. re-connect the connectors so that the process now flows through the automatic activity.
8. Open up the automatic activity's activity inspector and go to performer tag
9. Drop down the combo box named 'Executed this method automatically'.
10. Select the method created above. it should show up in this list otherwise dump the method object(dm_method) you created and check the value of a_special_app property. It should be 'Workflow' without the quotes. Only methods with a_special_app value set to Workflow will show up in this list.
11. save, validate and install the workflow. The workflow will look similar to this

12. Executing the workflow now will execute the automatic activity, try running it from webtop. To see this working in the process builder we can use the debug feature of the 6.5 process builder. Will explain how to use the debug feature in antoher blog.

Tuesday, December 23, 2008

Documentum Workflow for dummies

The hardest part of learning a new product is during the first few hours, especially if you are trying to learn it on your own. Here is a quick and dirty tutorial to spring board you into BPM. Before getting into the tutorial some clarifications on the latest product name changes in the TCM(transactional Content management) space.

BPM is old name for Process Builder
BPS/BPI is old name for Process Integrator

Process builder is the 'big brother' of Workflow Manager.

All products mentioned here is of version 6.5. To create and run a basic work flow in process builder the following products are essential.

Content Server(of course!)
Process Builder(obviously!)
Webtop(without this you can only create a workflow not run it)

Install Sequence
1. Content Server
2. Process builder
3. Forms builder docapp(even if you don't need forms builder, process builder docapp neeeds forms builder docap)
4. Process builder docapp
5. Webtop(ideally on a diff machine which runs an app server)

Pre-req steps
1. log into webtop as superuser/docbase owner
2. Go to Administration -> User management-> Users
3. Create the following users( make them iniline users, leave everything else other than the mandatory fields default/blank)
  • performer1
  • performer2
  • performer3

Steps to create a quick workflow
1. Open Process builder and connect to a docbase
2. Click on create manual activity icon on the tool bar and click anywhere in the work area(where the initiate and end activity shows up)
3. Click 3 times in the work area, this will create 3 activities 'activity-1', 'activity-2' and 'activity-3'.
4. Click on the create flow icon from the tool bar and draw flow lines from
  • initiate to activity-1
  • activity1 to activity-2
  • activity-2 to activity-3
  • activity-3 to end
5. click on 'create reject flow' icon on the tool bar and draw a flow line from activity-2 to activity-1

6. Select 'activity-1' and open 'activity inspector' from the right click menu.
7. In the 'activity inspector' go to performer tab.
8. select the tab 'by one or more manual performers'
9. click on the select performer button and select 'specific user' from the drop down, make sure 'assign performers now' radio is selected and hit next

10. In the groups list box select '' and in the users list box select the 'performer1' user and hit finish.
11. repeat steps 6-10 2 more times for
  • activity-2 assigning performer2
  • activity-3 assigning performer3
12. Select 'activity-2' and open 'activity inspector' from the right click menu.
13. select the 'transitions' tab for the drop down 'when this activity completes' select the option 'let performer select the next activities'
14. hit apply and ok.

16. Save(provide a name for the template and install it in a subfolder of your home folder), validate and install(process builder will automatically prompt for validation and installation when saving a process template).

Running the work flow

17. Login to web top and navigate tot he folder where the workflow is saved. If you don't see anything select the filter on right to 'show all objects and version'.
18. right click and select 'start' from the menu.
19. hit next and finish.
20. login to webtop as performer1 and goto inbox, you should see a task in your inbox. Right click and view. The hit finish, the task show disappear from your inbox.
21. login to webtop ad performer2 and goto inbox, you should see the task in your inbox. Right click and view, here you should see 2 options 'Forward' and 'Reject'. Hitting forward will take the task to performer3's inbox,rejection will take the task back to performer1's inbox. hit forward.
22. login to webtop as performer3 and goto inbox the task will be there. View the task and hit finish. This will complete the workflow.

In step 21 hitting the 'reject' will take the workflow task back to performer1's inbox. This simulates a rejection path in a workflow.

I have not addressed the technical side or the application side of the workflow because this is meant to be a quick and dirty lesson to help you break the ice with the Documentum process builder. The Process Builder user guide, content server fundamental and other documentation will explain in detail the associated types, objects etc of workflows. Hopefully this will tutorial will make it easier to go through those detailed specs.

Monday, December 22, 2008

Composer thoughts

Some recommendations to make Documentum composer 6.5 better. I have only used the DAR installation plugin for composer so far...so there maybe tons of other reccomendations. if you know of one please post them as a comment and I will try to incorporate them.

1. merge the DAR installer with the composer so that users don't have to go to different places to achieve different tasks.

2. Show the install log of when a DAR instalaltion happens, this used to be the case with docapp installer.

Friday, December 19, 2008

deploying DFS on Websphere 6.1

Deploying the DFS 6.5 SDK samples in websphere 6.1 is not straight forward. The OOTB build file will generate the .ear file, websphere dosent seem to like this .ear file. I will address the two issues(and solutions) I ran into while deploying this ear file in Websphere 6.1.

1. The META-INF/application.xml file generated by the emc defined ant task 'packageservice' does not have the right namespace definitions. When deploying the .ear file, websphere will complain about this right off the bat.

The 'application' tag generated by the emc ant task will look like this(without the <>)
application xmlns="http://java.sun.com/xml/ns/j2ee" xmlns:xsi="http://www.w3.org/2001/XMLSchema-instance" version="1.4"

Change the above tag alone to the following
(make sure to add <> at the start and end respectively)
application id="Example_ID" version="1.4" xmlns="http://java.sun.com/xml/ns/j2ee" xmlns:xsi="http://www.w3.org/2001/XMLSchema-instance" xsi:schemaLocation="http://java.sun.com/xml/ns/j2ee http://java.sun.com/xml/ns/j2ee/application_1_4.xsd"

IZarc provides a nice feature for editing a file(in this case application.xml) inside the ear file while preserving the folder path.

2. The ant target 'package' seem to add duplicate jar files in APP-INF/lib the file that is getting duplicated is 'emc-dfs-rt.jar'. This can be fixed by removing the following line from the build.xml file and rebuilding it(again without <>).

pathelement location="${dfs.sdk.libs}/
emc-dfs-rt.jar'"/